cakes of the past
This content uses referral links. The opinions expressed in this post are completely our own.
I just received a set of Russian piping tips in the mail and I am so excited to try them out! Since it's Fall, I'm thinking of a Chrysanthemum covered cake...stay tuned!
Thinking about cake decorating got me reminiscing about some of my favorite cakes of the past. I've never taken any cake baking or decorating classes, unless you count Google & YouTube. It is simply a hobby (some might say obsession). I like to think about cake flavor combinations, and I like to think about new ways to decorate cakes, and I like to look up different techniques, and I scroll through Pinterest for extra inspiration. Whenever I see an opportunity to bake a cake for some occasion, I pounce on it. It's selfish, really. My mind is overflowing with cake ideas and I want to try them out.
Here is one of my more recent cakes: A Hazelnut Truffle Crunch Cake. I made it for my sister-in-law's birthday. It involved a moist chocolate cake, brushed with macadamia nut liqueur (which is similar in flavor profile to hazelnut), frosted with a vanilla bean buttercream à la semi-naked, topped with a crunchy hazelnut praline, and decorated with liqueur truffles.

Just a few days before the hazelnut cake, I made a birthday cake for a sister-in-law on the other side of the family. This one was a classic yellow cake with chocolate buttercream. I kind of love how the vibrant colors stand out against the chocolate frosting.
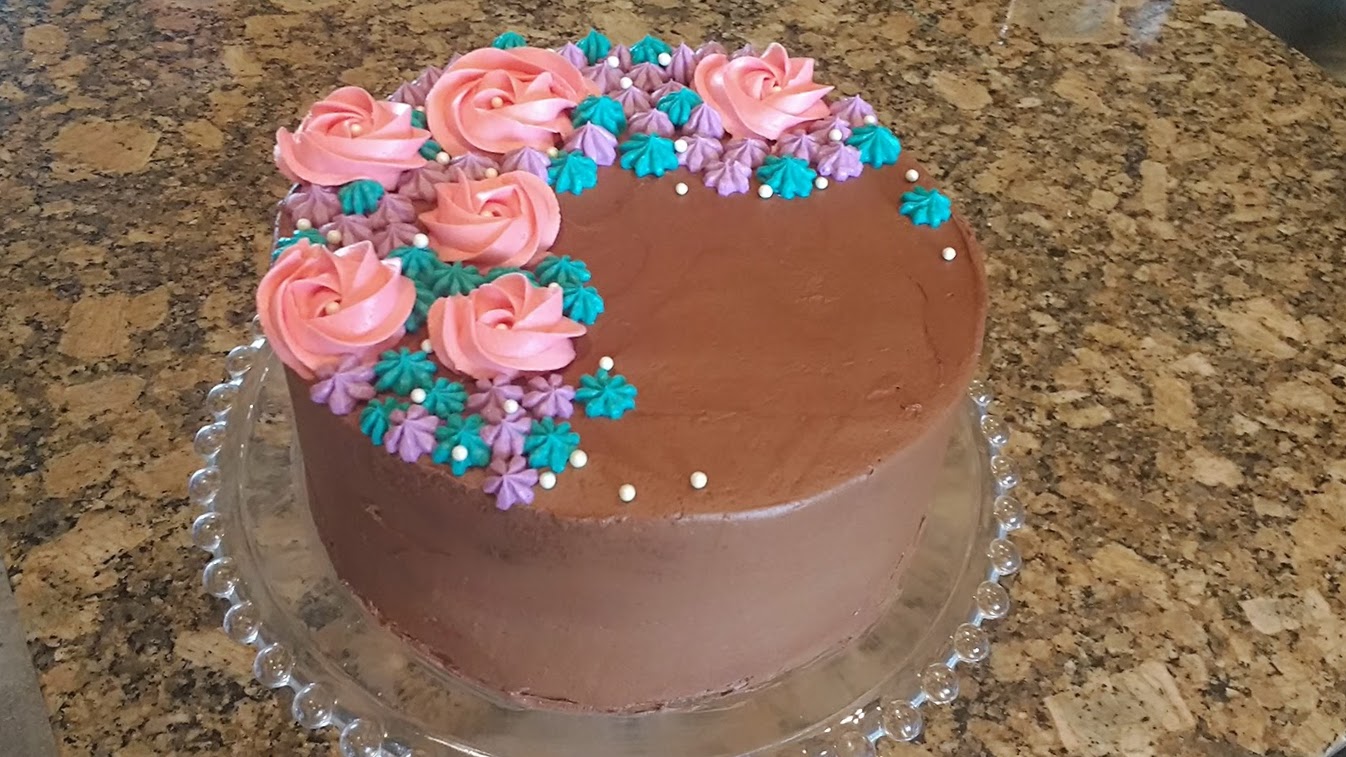
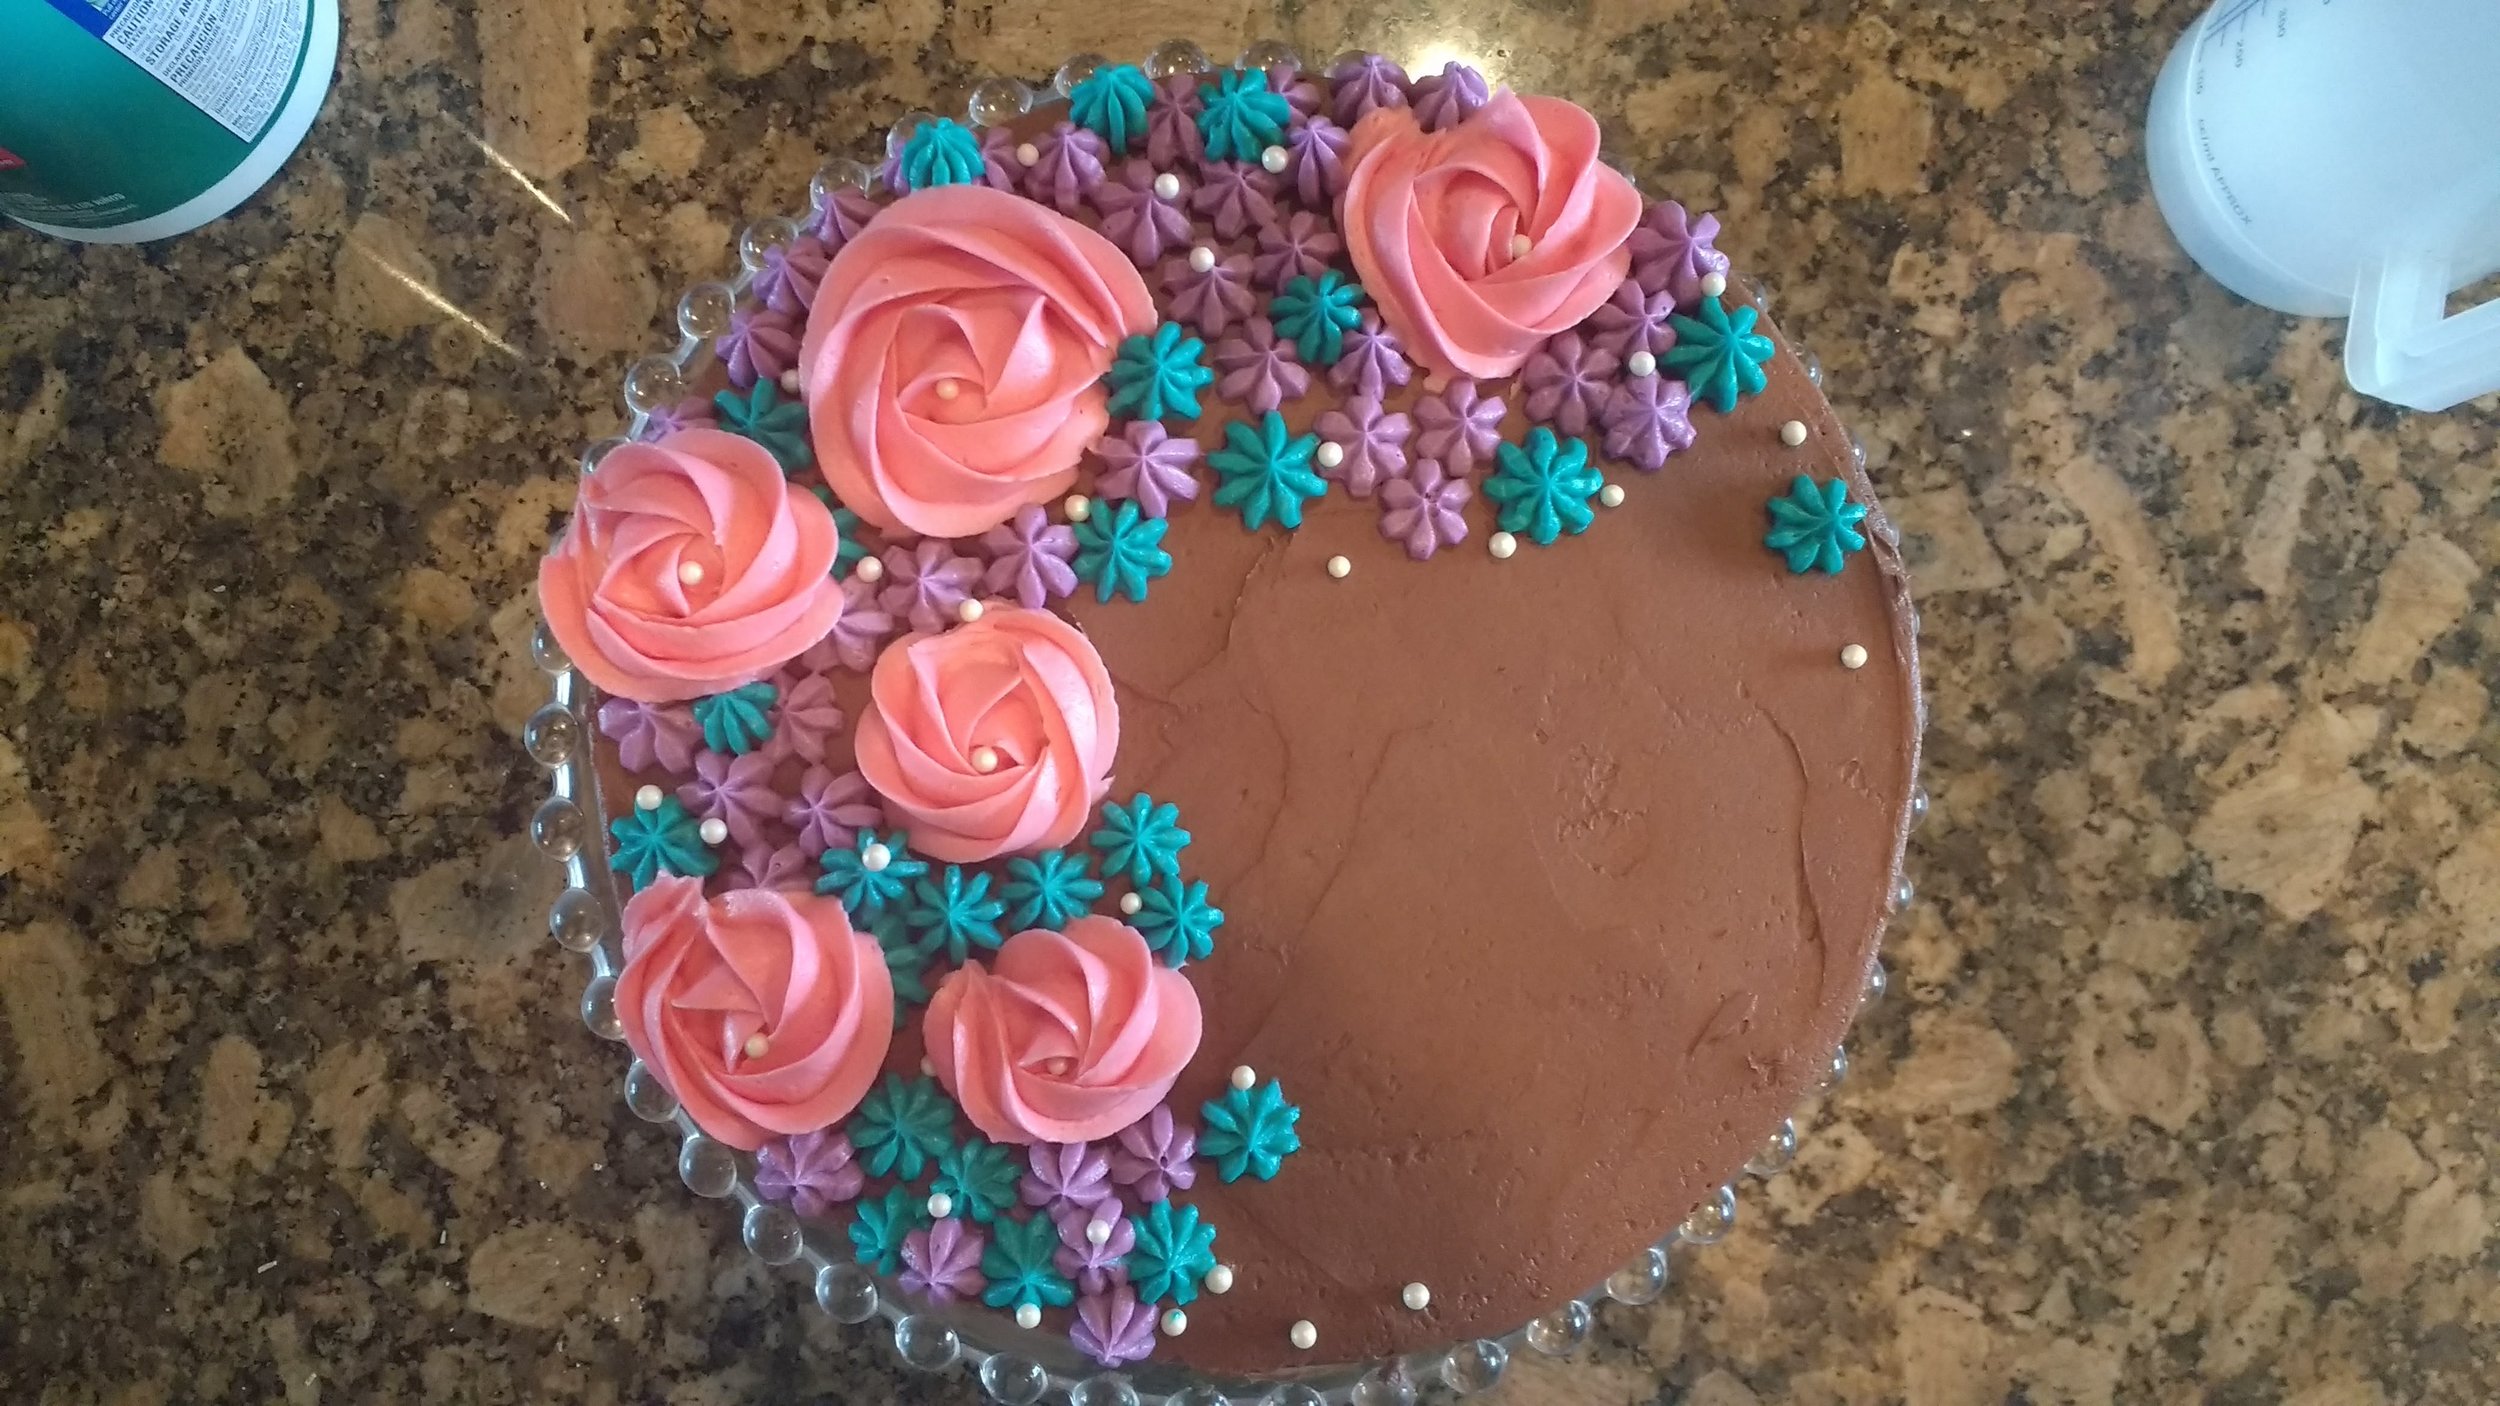
I ended up needing to make an extra half batch of vanilla buttercream for the piping on top. I love piped decorations, but it's kind of shocking how much extra frosting (butter!!) is required. That's why naked cakes are my new favorite thing.
Naked Cakes. First, they use about half the amount of frosting (butter!!) than a typical frosted cake. Second, they are sooo easy to frost. It's basically impossible to mess up (so long as the cake holds together). Third, they are so fast to frost. There is none of that pain-staking smoothing, the waiting between crumb coat and top coat, and so forth. All you have to do is slather some frosting on and scrape it around. And finally, they have that easy-going chill bohemian charm.
Below, there's a picture of a three-tiered naked cake I made for a friend's wedding earlier this year. The bride and groom went with my "classic wedding cake" flavor: rich vanilla buttermilk layer cake glazed with an amaretto syrup, filled with raspberry jam and topped with an almond swiss meringue buttercream. Gosh....swiss meringue buttercream. It's really such a special frosting; there's nothing like it. One of my favorite things about it is its glossy sheen. You can't tell as much on a naked cake, but check out the four-tiered wedding cake I did a few years back. The picture is terrible, but I love how the cake glows!


To the right of the wedding cake is a photo of a trial run (actually, it was for the "cake tasting"). In those days, I made pearl boarders out of homemade fondant pressed into a mold. Now, I prefer to pipe my pearl borders (it's much faster), which is how I did it in that last picture. The cake is the same cake flavor ("classic wedding cake") and I made it for another friend's engagement party. I'm increasingly committed to making edible decorations, but on that occasion I gave in and made a little bunting.
Another sweet celebratory cake is my strawberry champagne cake. I've made it on a few special occasions--including a bridal shower and a New Years Eve wedding. (The time I made this cake for a New Years Eve wedding actually has a funny story--coming soon.) The cake is a champagne layer cake, filled with strawberry-champagne jam, and frosted with a champagne frosting. For the bridal shower, I wrapped the cake in SugarVeil lace that I had painted with bronze luster dust. I have to say that SugarVeil is a bit of a pain to work with (especially in Southwest Florida's humidity), but it has an awfully lovely effect.
I used SugarVeil another time on a lemon dream baby shower cake below (lemon cake, lemon curd & lemon buttercream. When it's not topped with blue fondant, I like to decorate it with candied lemon peel).


But after a brief foray into the world of SugarVeil, I discovered chocolate piping as an alternative (easier) method of decorating cakes in designs. For a friend's birthday, I made a chocolate Samoa cake (chocolate cake, caramel coconut filling, poured ganache on top) and piped a custom chocolate topper, brushed with luster dust. The method here was that I cut out a parchment round the same diameter as the cake. With pencil, I drew out a design. Then, I flipped the parchment over so that the pencil was on the back side, and with a parchment bag filled with melted chocolate, I piped out chocolate along the lines. When the chocolate had set, I flipped it around and peeled off the parchment. After brushing the piped chocolate design with edible luster dust, I carefully transferred it to the top of the cake. (My brushing of luster dust was just a tad too rough for the thinner chocolate lines, so you can see a patch in the picture where the chocolate broke. If I had an airbrush kit that wouldn't be a problem! Lesson learned....) Here is the video I used for inspiration & tips.


I applied a similar technique in making red chocolate cupcake toppers for a Kentucky Derby watch party. I printed out on a sheet of white paper a number of jockeys riding on horses. Laying a piece of parchment paper over the print out, I followed the lines to pipe melted red chocolate. Once the shapes hardened, I peeled them off the parchment and set them upright on top of the cupcakes. This technique can be applied to any variety of designs, and I like that candy melts can be found in numerous colors. (These were red velvet cupcakes. Also another tip: it's so much easier to decorate and transport cupcakes if you leave them in their baking tins. Here, you can tell they are safely situated on the seat of my car for the ride to the party.)
Watching the Great British Bake Off got me into trying out chocolate collars. For my younger brother's confirmation, I made a red velvet cake with cream cheese frosting. To decorate the outside of the cake, I piped out a flame motif on a strip of parchment paper with red candy melts. Working quickly, I wrapped the paper around the cake. Once the red chocolate coating was set, it was simple to peel off and reveal a red collar of flames. It looked pretty cool.


And here's another cake with a white chocolate "fence" around the bottom tier. This birthday cake was a carrot cake, using a family favorite recipe which rivals all carrot cake recipes. (I'll have to get Maria to post it to the blog, since she's the one that discovered it for us.)
The carrot cake is filled with a rich pecan cream and topped with cream cheese frosting. Here, I piped a white chocolate "fence" design on parchment and wrapped it around the bottom tier. There was some hand-piping on the second tier, with a string of piped pearls along the top edge. Then I made a white chocolate bow, and an orange chocolate number. Plus, those are dried pineapple flowers. (Here's a tutorial.) They look a little sad in the picture, but in real life they look much better. I went a little crazy at the end and spritzed the pineapple flowers, the bow topper, and the chocolate numbers with edible gold.
I probably make a cake 2-3 times a month. Usually I'm working under time constraints (especially with two under two!). Over the years, and from many mistakes, I've learned a lot about the cake baking and decorating process. But there is so much I haven't tried, and so much more to learn.
I'm excited to continue posting about my cake adventures on this blog, to get better in the process, and to share along the way some tips and hints and hacks.


